Friday, November 18, 2011

Lash Talk

We all want thick luxurious eyelashes, but sadly few of us are actually born with them. We do what we can to make our lashes look longer and thicker like applying black eyeliner...


  Unfortunately though, sometimes black eyeliner doesn't look quite right...


Then we apply our nice thick mascara. That should do the trick without being too overwhelming, right?


Perhaps if we spend a whole lot of money, we can get a descent result. There are other options such as getting eyelash extensions or transplants, and even dying eyelashes which is called eyelash tinting. The result?


Eyelash extensions can look unnatural, and cost from $100 - $500 USD to have done. Eyelash transplants can cost even more, and you'd have to keep trimming your lashes because they use your hair to transplant in to the follicle, so they keep growing!

Eyelash tinting can cause serious chemical burns or allergic reactions, but is more reasonably priced than extensions or transplants but... you could come out looking like the lady above. So, what's the best solution for those of us who want thick lashes, but don't want the risk or expense of procedures?

False lashes of course!

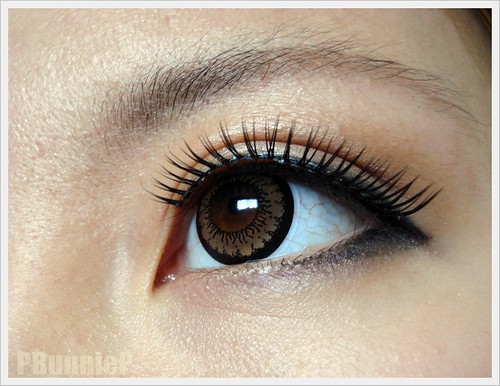
Falsies are easy to apply, and can look natural or dramatic, depending on which you buy. The best kind to start out with are the ones you get for less than $10 at the drug store because the lashes cost enough to be good quality, but don't cost so much you'd be scared to ruin them. Be sure to pick up some eyelash glue while you're at it.

Start by holding the lashes up to your eye to measure the length. You'll want them to start a little bit after your natural lashes do if you have dense but short eyelashes, or a little closer to the inside if you have sparse eyelashes. Trim off the excess length from the outer (longer) edge.

Some people apply their lashes after their makeup, but I find they end up peeling off when I do this. My tip is to start off by priming your eyelid with liquid foundation or concealer, then applying the lashes. I find the foundation keeps oils from loosening the glue, but doesn't stop the glue from sticking.


Some false lashes are on a stiff band, so be sure to wiggle the band a little to make sure it's flexible, or bend it to more closely match the contour of your eye. Apply a thin line of glue to the lashes. You want enough glue that you can see a solid line, but not globs of it. Wait just 15 - 30 seconds for the glue to firm up a tiny bit, then using tweezers, stick the lashes on starting at the outer edge. Try to make sure the corners are stuck down where you want them, then hold in place for at least 30 seconds.
Once you have them stuck on, wait a few minutes before going further. Maybe work on your lipstick or hair in the meanwhile to give the glue a chance to really set.

With just the lashes on, you may notice you have an obvious line where they end. This is easily fixed with a bit of liquid eyeliner. Just start where the lashes end, and go toward the corner of your eye. If your line is too thick you can lightly wet a cotton swab with either water, or a bit of baby/mineral oil and trace the upper edge of the line  until it's as thin as you like. Curl with your eyelash curler, apply a bit of mascara if you like, and that's it! 

Be sure to do all this after you put your circle lenses in though!! 
Wednesday, November 2, 2011

Super Size 17mm Circle Lenses

Circle lenses come in sizes ranging from 14 to 15 millimetres; the average iris is 13.8 millimetres in diameter. Now that circle lenses are becoming more popular worldwide, sellers are using different marketing techniques to draw in customers. One of these techniques is size confusion.


You may have seen ads that look like this:
17.5mm? That wouldn't hardly fit in your eye!


These lenses appear to be huge and as a first time buyer or to someone who's bought 14mm lenses and wasn't happy with the size, may seem fantastic. The problem is that there are no lenses that are truly larger than 15 - 15.5mm. This super large size is measured by flattening the lens; removing the curvature adds diameter. Circle lenses are measured by the manufacturer by their diameter subtracting the curvature. This is done by simply measuring the diameter of the lens as it sits and not flattening it. This causes slight differences in the reported sizes, and some may say a 14mm lens is 14.2mm but these slight differences are not intentional exaggerations like claims of 17.5mm lenses. Yes they are that wide, but only when flattened, with the curvature they may only be 15mm.


Don't be fooled by such simple marketing techniques. Don't use just any supplier's photos as a guide, instead use the photos of the lens in an actual person's eye as your guide. This way you'll see what your lenses will actually look like, not how some suppliers want you to see them!


Geo Angel in Green 14mm

Wednesday, October 26, 2011

Halloween Nail Ideas

Need some ideas to get awesome Halloween nails in a hurry? After reading up on the subject myself, and trying a few things out, I've come up with some time saving tips to get great Halloween nails!


On the pinky I've got a cute Candy Corn design! Easy to do with just three colours.
Start with the Orange as a base
Do a dab of yellow near the cuticle to make a shape like your natural moon
Finish with a stripe of white
Done! Looks great, but if you don't have matte orange, yellow, and white, you're out of luck.


On the thumb I've got black and orange as a base and Sally Hansen's Crackle nail polish in Fractured Foil. Looks great, but what if you don't have the crackle polish?

You can easily do any of the three designs on my index, middle, and ring finger provided you have any light colour to use as a base, and ... a Sharpie!
First, paint your nails in your chosen base colour. Apply clear coat, and wait til dry. Thoroughly.
Using a good quality permanent marker like a Sharpie, draw your design being very gentle and only barely touching the surface of the nail with the marker. If the marker seems to skip along the surface, or is streaky, you are pressing too hard.
Tip: Ask a friend to do your dominant hand for you.

You can see how to do the skull and spider web at Lipgloss and Black's blog. They are a Toronto based indie fashion house with awesomely dark but modern clothes. Check out their blog to see an alternate way of doing the spider web.


Drawing the spider web is easy, just make kindergarten waves!


Fig.1: Terrible drawing using laptop's touch pad

Start with the curved lines, making what looks like the way a kindergartener would draw waves in the water if asked to. Join each wave line together with a straight line going through the points of each.

As for the ghost design... Well, I'm sure anyone can draw a better ghost! Mine's terrible! >.<
You can even write something (Boo!) draw a bat, or anything else you can imagine...


Once you're done drawing your design, be sure to wait several hours before applying topcoat. When you do, use as few strokes of the brush as possible, as it's easy to get streaks of black on the white. If this happens no worries, you can just touch it up with your white nail polish on a toothpick. Clean up any nail polish from your cuticles with a cotton swab and some remover, and you're good to go to the Halloween party!


What do you think? My favourite is the Candy Corn nails, but I hate the candies!


Monday, October 24, 2011

How to Put in Contacts

I personally have always found eyeballs and the mere thought of touching my own to be quite disgusting. Our eyes are delicate, and quite magical in the way they work. Because of this, and stories I'd heard about contact lenses becoming lost in the eye, I'd never wanted to try them. Once I heard of circle lenses though, I really wanted to try them out because of the awesome eye enlarging effect. The tips I've posted here are what got me to finally try circle lenses, and now I love them!

To get over the fear of touching your own eye, and putting something in it, you need two things; knowledge, and practise.

Did you know there is less feeling in the sclera (whites) of your eye than the iris? You can actually touch the sclera and not feel any pain at all! To try it out you just need some contact lens solution; first go to the bathroom and wash your hands and dry them thoroughly. Pour a little contact lens solution on your finger, then look to one side in the mirror. With your clean wet finger, gently touch the corner of your eye. You should feel the pressure of your finger, but no pain. This is because you are not disturbing your eye at all, just gently touching with a wet finger. This is what you will feel when putting in your contact lenses.


Here's the best video to show you how to put in and take out your lenses. It's made by Acuvue, and is what helped my get over my Ommetaphobia (fear of eyeballs)


How to Insert Contact Lenses

  • STEP 1: Thoroughly wash and dry your hands with soap and a clean towel.
  • STEP 2: Rinse your lens with solution to remove any trace of debris.
    Tip: Do not use your lenses straight out of the vial. They must soak in solution for at least 4 hours prior to first use.
  • STEP 3: Place the lens on the tip of your index finger. Be sure the lens is correctly oriented by checking the sides are straight, and not flared out.
  • STEP 4: Use your other hand to hold your upper eyelid so you won’t blink.
    Tip: Be sure this hand is dry to avoid your eye still pulling shut
  • STEP 5: Pull down your lower eyelid with the other fingers of your applying hand.
  • STEP 6: Look to the side and gently place the lens on the white part of your eye.
  • STEP 7: Slowly move your eye to look at the lens to centre it.
  • STEP 8: Release your eyelid and close your eye for a moment, or blink a few times.
  • STEP 9: If your lens feels uncomfortable, remove it and inspect for damage or debris. If it’s damaged, discard it. Otherwise, rinse with more solution and reapply.

How to Remove Contact Lenses
  • STEP 1: Thoroughly wash and dry your hands with soap and a clean towel.
  • STEP 2: Move your head to the side while looking straight in to the mirror.
    Tip: To avoid mixing up your lenses, always apply (and remove) them in the same order.
  • STEP 3: Bring your index finger close to your eye until you touch the edge of the lens.
  • STEP 4: Gently hold it in place as you move your head back to centre. This drags the lens off of your iris without having to touch it.
  • STEP 5: Gently squeeze the lens between your thumb and index finger and remove it.
  • STEP 6: Remove the other lens following the same procedure. Always be sure to rinse your lenses before putting them away.
 

So, now that you know how easy it is to put your contacts in and take them out, you can order your circle lenses! Just visit the Shop page and there you'll find all our latest styles of circle lenses in stock and ready to ship to you! One more tip, when choosing your first pair of circle lenses, try to go for a smaller (less than 14.5mm) size, and a colour close to your own. This will help you get used to putting them in, and their bright big eyed look!